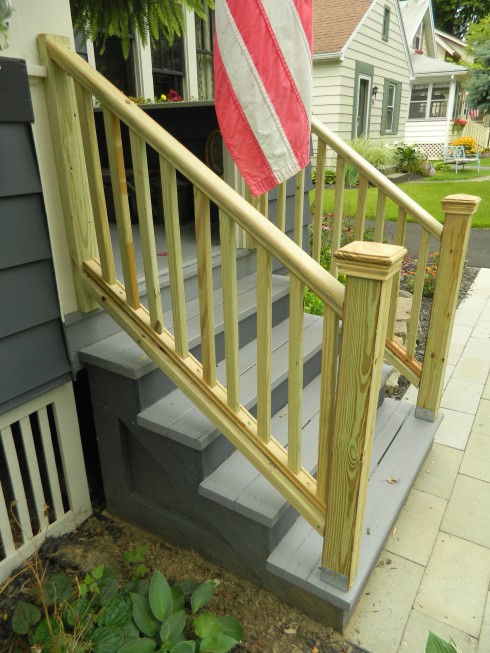
Hate to say it, but summer is wrapping up and as I got closer to the idea of school starting again I realized that I was going to have to start taking my To Do List a little bit more seriously. There were thee things on it that I had been putting off – add a flagstone retaining wall around the front flower beds, replace the furnace and change the railing on the front steps.
Knowing nothing about building a railing. I decided that building one would be the easiest (and cheapest) task to knock of. Believe it or not, I was right. I don’t even have a long story about all the things that went wrong or how I went insanely over budget. I even did it on one Saturday afternoon. Win.
There were some moderately tricky parts which I will outline below here:
Figuring out the angles was just a little slow, and I’m sure that there are fancy ways of doing it but I don’t really care. I just took whatever needed to be cut and used my miter saw to just trim a tiny bit off at a time until I found the cut that worked. It took a little extra time but I didn’t really mind. Turned out my spindles needed to be cut at about 35 degrees for anyone who might be wondering where a good starting point is.
I wasn’t really sure how railings were built. Thankfully, it was easy to find out. All I had to do is look around my street and there were all kinds of good (and bad) examples to consider. I then went to the hardware store and looked at the pieces and parts they had and kind of assembled it in my shopping cart based on what I saw on my street and what I knew I wanted it to look like.
The other part that was a little challenging was attaching the posts to the step. Most people lag bolt them into the sides of the steps. But that was not the look I was going for. So I was able to use a metal Strong Tie which I found at the hardware store to make the attachment. This way my post sits on top of the step which I think looks more traditional. later I’ll cover the metal with some base moulding.
The last hard part was when I needed screw or toenail the railing tops and bottoms into the bottom post. It takes a little finess to get it right and done solidly since you are coming in from the bottom and the spindles (on the top) and the steps (on the bottom) are in the way. At any rate, I did a mediocre job at this.
But you know what? It doesn’t really matter. You know why? Because the railing is totally solid and looks just like it has always been there (or it will, once I paint it).


Your new railing looks great! I love wooden steps and wooden railings on bungalows, but unfortunately our 1922 bungalow has cement steps and and we had to replace a rusty wrought iron rail that finally broke off, with a new wrought iron railing. Our steps go to the side of the driveway so there is only one railing.
The porch needs to be replaced; the wood underneath it, the wooden railings around the porch and the two wood columns are rotting. We are not DIYers, so it will be a big expense. We bought the house 5 years ago and were first time home owners even though we are in our 50’s and 60’s, so we probably made a mistake buying it. We didn’t think about how expensive it would be to do anything to the house.
It is a very small house with two tiny bedrooms. There is a big attic, which we thought we would try to convert until we found out it would cost at least $40,000. The kitchen has
several layers of old linoleum on it and is badly needing to be replaced. The cupboards are plain looking plywood cupboards that the previous owner built–he probably tore out the original ones, which were probably better. We have very little storage room–only 2 small closets in each bedroom and a tiny, narrow cupboard for towels/toiletries outside of the bathroom, which is very small, but probably has the least problems. The basement is divided and one half was used for a workroom (where he built the cupboards), so it is well-lit with several florescent lights–my husband now uses it for an office. The other half is the laundry area and there is a half-bath. The basement did not have any water issues until last winter when we had a little water come in when the ice started melting. This hasn’t happened though since then, and we’ve had a fair amount of rain this spring/summer.
Our yard is postage stamp size and has a chainlink fence around it. Our patio, driveway and sidewalks going up to the house are badly cracked–some of the cracks are 2 or 3 inches wide.
I hope you don’t mind me going on about our house (everyone else I know is tired of hearing about it 😉
I like your blog and find it inspiring, even though we are not really able to do much with our house. Thanks for doing it!
Thanks Jeanette! Your house sounds a lot like mine. My yard is small and I have only two bedrooms as well as an unfinished attic like yours. When I started, I was overwhelmed too because I had never fixed anything before. However, once I got the courage to try I was able to do more than I thought. Plus, most of my stuff was already messed up so I wasn’t really too worried about making it any worse!